'The true Soldier fights not because he hates what is in front of him, but because He loves what is behind him.' -G. K. Chesterton
Showing posts with label garage. Show all posts

02 October 2012

Bike Rack

Lu and I are avid bicyclists, both on and off road. We currently have bikes for both disciplines which means four bicycles to store when not in use. My garage/shop is 32 feet long but only 14 wide. Which means it can tend to be a bit crowded. Especially when one is hip deep in a complete house renovation that will take a year and a lot of tools and materials. Yes, I am a bit...disorganized. I needed to get those bikes out of the way and off my floor.

Time for a bike rack. But for anyone who knows me or has read my DIY project write ups you know I don't go for simple. Oh no. Complex and needlessly difficult are my hallmarks. So.

I decided the bikes would fit best on a wall so I started with a 4x8 sheet of Oriented Strand Board (OSB). I mounted it against a wall. This will form the base of my Bicycle Storage System. Note the adjacent shelf for bicycle paraphernalia such as tubes, helmets, etc. Later I'll get a bike vise which will go on the other side of the rack.

Ok. I wanted to hang the bikes on a hook system mounted to the OSB. I went with rebar because it's both easy to work with and very cheap. In fact the local steel shop had an 8 foot length laying around that they gave me for free. I wanted 3/8s but this is 1/2. Hey free is free.

First up, a way to mount the rebar hooks to the OSB. I cut and welded two Z hooks together. (Yes, that is my case tumbler back there. I do my case cleaning outside. See Brigid? I actually listened to your good advice. Proof that old dogs really can learn new tricks.). Please bear in mind that my welding is pretty much the same as my view on life. Bull your way through and more is better. Pretty my welds are not but I get there by sheer exuberance and stubbornness. Besides, I have a perfectly good grinder right there.

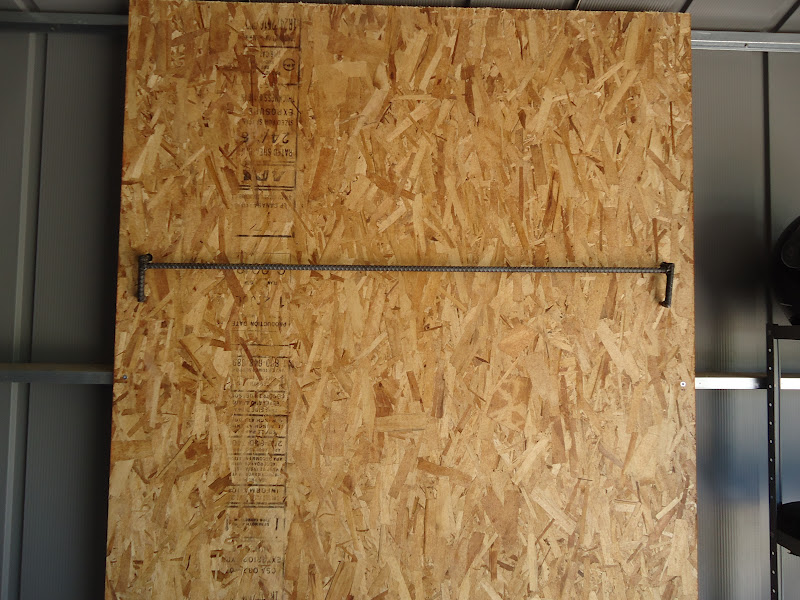
I measured how far up the OSB I needed the rack to be and drilled two 3/4 inch holes. The Z brackets fit into the holes and lock down with the weight of the bikes.

I test fitted the brackets to make sure I got it right and measured for a small nub at the bottom which will keep the bracket parallel to the OSB.

The final brackets.

And this is how they look installed. The top of the Z bracket locks in to the back of the OSB and holds everything up. Very secure.

From there I welded in a cross piece to tie the two brackets together and give me a way to mount the hooks for the bikes.

Time for the hooks. I wanted 3/8s rebar so I could bend some J hooks. I got 1/2 inch instead. And my oxygen tank is currently empty. And I have absolutely zero patience. And I love to weld. And I'm not the brightest light in the night sky. So I cut and welded up four J-ish hooks instead and then welded them to the cross bar in the mount.

Here's the finished rack mounted to the OSB. Note that the two hooks on the left face right and the two on the right face left. They're also at slightly different angles to limit bicycle entanglement when they're all mounted. I wrapped the J-hooks with black electrical tape because it works well and I'm really cheap. The hooks are at a height that Lu can easily access. She's a shortie you know. Love you sweetie :)

Time to try it out. The bike wheel hooks under the J-hook and both tires lay flat against the OSB. This is our biggest bicycle (No fat guy jokes!) so if the hooks hold it they'll hold the others easily.

It all looked good so it was time to put it to the real test. All four bikes. They go in alternating rear and front wheels in the J-hooks so everything fits neatly.

Not too bad. I'm able to fit in 4 full sized bicycles in a four foot wide space that only juts into my garage about another four feet. Some of you who are sharper eyed may notice that the top of the OSB is leaning out just a bit. That was an oversight on my part. The center two cross braces in the building framing are 4 inches while the top is 2. I later corrected it by putting two long bolts through the top of the OSB and into the top brace. The top is now straight and supported.

All in all I'm pleased with how it turned out. It may not be the most elegant design and it certainly could be done better but it works well and cost me a grand total of 8 bucks for the OSB and a couple of hours of time. The bikes are easy to mount and take down and keep them away from the main shop area.

Of course there's costs and then there's costs. Remember kids, welded stuff gets kinda hot. Best not to touch it. Or blunder stupidly into it whilst tripping over crap you've left on the floor. Not that that's what happened to me. Nope. Just saying is all.

Hey, if I didn't bleed while doing it it's not a true Six project.

Six

10 June 2011

Garage Build

The delivery guy dropped off a package on Tuesday afternoon. It was 9 large boxes and 1 small one on a triple long pallet.


Here's the boxes, unloaded and partially opened. That's a lotta parts!

First step is to do some assembly, lay down the foundation and put up the corners, main pillars and support beams. It's important brace the walls as at this point it can be blown down by a strong wind.

Slot A goes into Tab B and then attach the doohickey with alternating thingies. Got it. Wait...what?? I'm a guy. I hate instructions.

The 2 main trusses. They had to be assembled piece by piece by piece. There were a lot of parts.

This is where we left off yesterday. Most of the main supports are in and the trusses and roof beams are assembled and ready to install. That's what we'll be working on today along with putting on the exterior sides. We're still several days away from a completed garage.

More tomorrow.

Six

31 May 2011

Building Ordered

Now that the slab is done it's time for an actual building to go there. I went online and ordered it today. It ships truck freight from Ihavenoideawhereusa and is scheduled to be delivered on or before June 10th (nothing like a firm delivery date), right to my driveway.

This is my building. Here's why I chose to go this way.

A comparable wooden building would have cost me anywhere between 10 and 15 thousand to build, depending on some choices like trusses, sheathing, entrance door(s) and shingles. In this building everything is built in and comes in a kit. I don't need all the inspections that go along with custom buildings either; framing, sheathing, roofing, etc., ad nauseaum. I'd even have to either buy custom trusses or pay an engineer to either design them or sign off on my design before they'd Ok construction. This way it's no muss, no fuss. For $4200 out the door I get a sturdy, engineered building with a 15 year guarantee. It'll take me a weekend to put up (He said knowing Murphy was laughing his ass off and making plans for a visit to Hurricane and the Six household in the very near future) and I'll be done with this project at a little less than five grand total. Not bad for a 434 sq. ft. garage/shop/storage building. I'll post build pics and a rating of the quality of the building. I'll be as brutally honest as I can, just in case anyone else is considering such a project.

Man, I need to get this finished. My honeydo list is a mile long but most of it I can't even begin until this is built. It just better be right. It's not like I can start this process all over again.

Six

26 May 2011

Concrete Pt. Deux, Zombie Screeding

The delivery truck was a few minutes late which was good because so was Lu's nephew, our third worker. I failed to get any good action pictures as the concrete was being poured because I was just a little busy and kinda forgot. We worked our butts off and are pretty much Zombies at the moment. We even had Cannibal Pizza for dinner. Well, really it was a Domino's Meatsa but we made the Zombie sounds while we ate it and pretended it was braaaiiiinnnnssss.

This is just after the pour was completed. It's been screeded and I've already done the first and second float and started on the edging. The concrete was Six Sack so it was a bit hard to work. I should have asked for it to be a bit wetter. By this time it was getting hard and I had to keep the floats wet from a bucket to even get it to work at all. Live and learn.


Finishing the edging. Still one more floating to go and then the final broom finish. I chose broom because I want a very rough texture. Among other things I'll be doing vehicle maintenance and repair on this slab and I'm both clumsy and a slob. Oil and slick finished concrete are an invitation to disaster for crash boy.

And here is the finished product. That's just a bit over 5 and a half yards of concrete. It'll fully cure in about a week but as of this post, about 7 hours after the pour, you can already walk on it. That's partially a result of the climate and weather and partially because I chose a very hard mixture. It's hard to work but with the steel reinforcement it shouldn't crack. For the next few days I'll water it and keep it covered with plastic to allow the chemical bonding to occur without drying out the concrete. That results in a proper cure and good concrete that'll be strong and last a long time.

A word on screeding. Screeding is where you draw a straight edge back and forth across the concrete to spread it evenly across the pour. This is a 14 foot wide slab. When I made the pour plan I had a 16 foot 2x4 as the screed. Car Guy verbally smacked me upside the head me and informed me that a 2x4 that length would bow too much and never work. Since he is the Car Guy, and therefore presumed to know all there is to know about concrete, I heeded his advice. A 2x8 would have been too heavy and unwieldy so I went with a 16 foot 2x6. He was right. It was the perfect choice. Glad I thought of it. Oh allright. Thanks Car Guy. You were right. And thanks to Lu's nephew.

In the next few weeks I'll be ordering my new building. Can't wait. And yeah, I'm taking tomorrow off. It's hell getting old.

I wonder if there's any of that brain pizza left.

Six