'The true Soldier fights not because he hates what is in front of him, but because He loves what is behind him.' -G. K. Chesterton
Showing posts with label backyardengineering. Show all posts

08 December 2011

Ok, Now It's Done

The last item to be completed on the pirate ship is now done. You'll recall that I painted it Ace Pirate Ship Brown but I didn't do any decoration. That was waiting for 2 small hands and large imaginations. And it needed a name. Behold the USS Ghost Pirate.
Why Ghost Pirate? Because she's 7 and he's 5 and that's just the way they roll. That is a picture of the ship's namesake below the name. He looks pretty darn ghosty piratey to me but then I may just be a bit prejudiced.

Here's Little Bit proving she can both paint and spell. She did the bulk of the work while The Boy hung out and 'supervised'.

Small hands, some poster paint, a small paint brush and a big heart can work wonders.

The ships wheel. It was a lazy susan Lu found but it's now been turned into the mechanism to move worlds.

A pirate ship moves on water. When none is at hand then some must be provided.

Little Bit graciously gave the back side of the ship to The Boy. It's clams, starfish and way down at the bottom a treasure chest.

The kids decided to honor the builders by inscribing our names on the ship. Grandpa got the prime spot which put a smile on my face I'll never lose.

If you look just behind the swing you can see a cannon complete with cannon ball and lit fuse. I even hung Christmas lights on it.

Touched by angels it is now complete. A child's play area is not done until those it is meant for have christened it. When I look at it now I no longer view it as a blank canvas waiting for the master to create a work of art. It is whole, warm and inviting. It says "Here there be children". No captain ever had a finer vessel. No Papa ever had finer grandchildren. If what we create is a mirror of our souls then I am content. I made 2 small children happy. I better epitaph I cannot imagine.

Six

26 November 2011

Pirate Ship Update - Finished (Mostly)

It's been a while since I posted about the Pirate Ship I was building for the grandkids. I managed to break Lu's camera and still haven't replaced it so when the DO got here she took some pics for me. Click any picture to enlarge.

Here's where we left off. The main cabin structure without siding and the beam laid on for measuring. No prow and no landscaping.

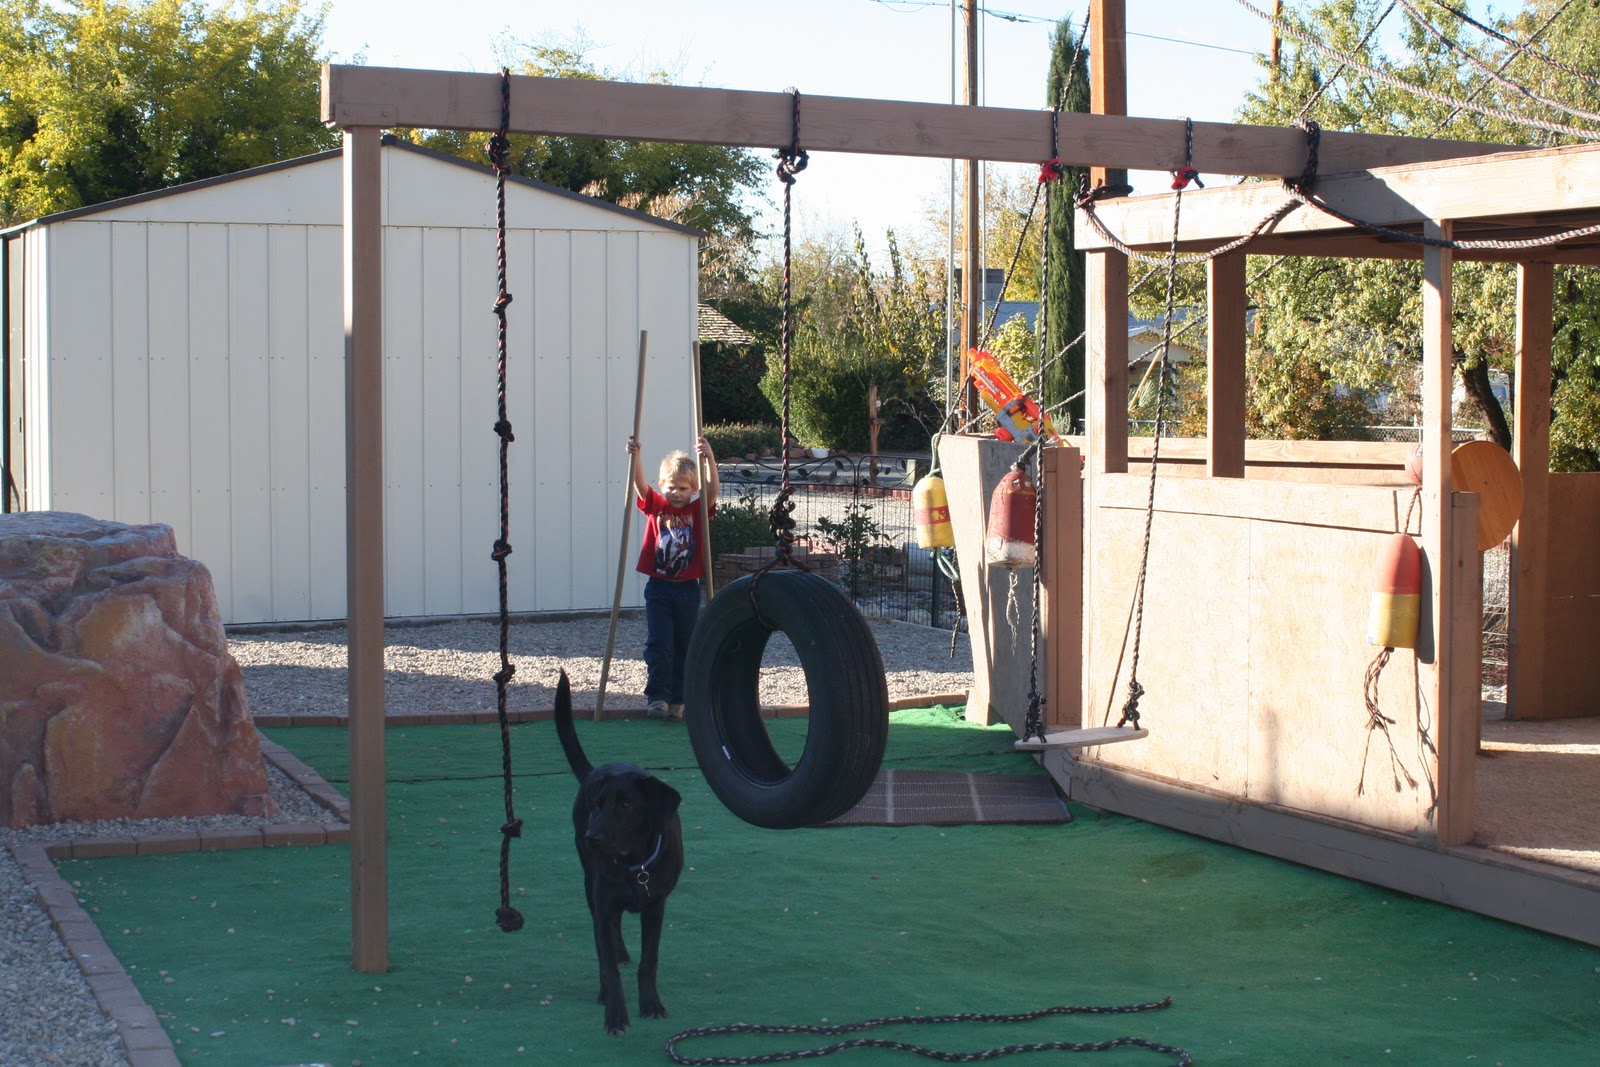
Because I was sans camera I didn't get any further build pictures so here's the finished project. I'll just have to talk you through what I did, how I did it and why. I was overruled on the whole two story thing by higher command. I just cut off the 4x4s at the rear of the ship and used the two in front as rigging. The 4x6 beam is bolted to the roof with the end held up by a 1/4 inch steel 4x4 that's 10 feet long. The steel 4x4 is set 3 feet into the ground with 160 pounds of concrete. The beam has a swing, a tire swing and a climbing rope.

The prow is set on another pier block and attached to the main cabin with 2x6 framing. The floor is OSB over 2x4 floor joists. When I decided against it being two stories I went ahead and roofed the main cabin with shingles. The sheathing is more OSB with 2x4s and 2x6s for support. Everything is either nailed or screwed together.

Lu and I were at an antique store when she found this rock. It's fiberglass and it is way cool. 75 bucks. I love finding stuff like this and it added a nice climbing rock to the play area.

We had some old fishing net floats that Lu contributed to the build. I hung them on the sides and used some nylon rope as rigging.


Here's another view of the swings. I wanted to keep the ship theme so used wood and rope everywhere I could. Lu tested everything out. Just to be sure it was safe of course.
 
You can see the steel 4x4 post here. At the top I took two pieces of angle iron, welded them together to form a U bracket, drilled it, welded it to the post and lag bolted the whole thing to the beam. It's solid as a rock. That was Sarges idea. I was going to use an A-frame but this is both stronger and takes up a lot less space.

I bought a small basketball goal and mounted it to the end. We're planning on having some epic HORSE games. I went down to Ace and bought two gallons of brown paint. The paint guy asked me what shade and I told him Pirate Ship Brown. He offered a color, I accepted and it's now officially known at my local hardware store as Ace Pirate Ship Brown. He still chuckles whenever I come in.

Every Pirate Ship needs protection and this one is no different. This is a gun ship not a sissy merchanter. If you look closely you can see the cannon mounted on the side of the prow. That is most emphatically not a Nerf gun. It's a period correct replica of a repeating cannon manufactured in the 17th century by Theodor Geisel Armaments commonly referred to as a Ma Seuss. It's NFA of course. You can also see inside the main cabin. There's a 4x4 post just inside the doorway that holds the ships wheel. I put down some old carpeting I had from the bathroom/hallway remodel for padding. It's snug, cozy and a great clubhouse.

All in all I'm please with the result. The ship measures out at 7 1/2 feet wide by 20 feet long and 8 1/2 feet high not including the spars. It's surrounded by outdoor carpeting with gravel around the whole thing. It has swings, ropes, a basketball hoop and a rock to climb. The kids seem to enjoy it so I'm calling it a success.

Here's a random photo of Angus enjoying the play area just because he's so cute.

The yard was originally dirt and weeds. Lu took care of the weeds and I covered the rest with landscaping fabric, outdoor grass carpeting and gravel. That's 10 tons of gravel I moved by wheelbarrow, shovel, rake and a 5 gallon bucket. Each and every pebble. It really looks quite nice with the ship surrounded by a green sea and gravel shoals. There's plenty to do and it's a nice place for adventures and fantastical voyages of imagination. I thoroughly enjoyed the build with enthusiastic help from Sarge and Lu. It was all done off the cuff and straight out of my head. I think that's called seat of the pants engineering. All you real engineers should probably just look away. I tended to over build and it's managed to stand up to hard play and the usual Hurricane winds. This place is aptly named. The kids are going to take some paint to it and decorate it to their hearts content. It also needs a name. Monikers are being bandied about and as soon as one is chosen it will be painted on the prow.

This was a true labor of love. We managed to turn a couple of hundred square feet of dirt, mud and weeds into a play area for the kids that will hopefully allow them good, clean fun and a chance to exercise their imaginations as well as their bodies. I hope it reflects that.
 
Six

28 October 2011

Rebar Target Stand Pt.2. The Failing.

So we loaded up and headed out for a nice shoot today. Me, Lu, Sarge and MomInLaw. We had a good time and I found out the limitations of the stand.

Here's the stand in the back of the truck, broken down for travel.

Lu and i brought the cowboy guns. From left to right; Lu's Ruger vaquero 44-40, Lu's Marlin 336 30-30, my Ruger Blackhawk 45LC and my Marlin 1894 45LC.

Sarge brought his Sig P226 in .40, a Remington 870 12 ga. and his Sig P230 in .380.

Sarge and I set up the stand with cardboard. I later glued 3x5 index cards to the cardboard for targets.

Here's the back of the stand with cardboard attached.

Ummm. We might have a problem here. I took a deliberate shot at the left upright with Lu's 30-30.

It failed pretty spectacularly. You all saw this coming, didn't you? I was just sooo sure it'd be too hard to smack it dead center and a glancing hit would just ring and maybe turn it. Sigh.

Still, that's a pretty direct hit. Not a bad shot but a dismal failure of the steel. The target stand was still usable though. I broke it at the failure point, stood it back up, put the cardboard back on and we shot for another 30 minutes. At least it still worked. That's something. I guess.

There was one other issue. Someone managed to hit the tip of the lower left hanger and bend it into a U shape. It was instructive but still kinda cool. I mean, what are the chances?

So. What did I learn? Having the steel and hangers directly behind the cardboard and targets is a bad idea. On the next stand I'll drop the height by one foot, from 6 to 5 feet. I'll widen and lengthen the target area so it's a larger opening than the cardboard. Since my cardboard is 30x40 I'll go just larger, probably 32x42. I'll change the hangers so they protrude into the target space instead of sticking directly out from the frame. I'll also go thicker on the rebar. 1/2 inch instead of 3/8. The hangers need to be immediately replaceable. Something with bolts drilled through the rebar is about as far as I've gotten. Tips and ideas will be great appreciated.

A failure but not total. I now know where the weaknesses are and have a fair idea how to address them. I'll fix this stand but reserve it for .22s and shotgun patterning only. The feet worked perfectly and with the addition of Instincts U-pegs wind isn't going to be an issue.

Meh, live and learn.

Six

24 October 2011

Rebar Target Stand

Sarge had an idea a while ago that's been percolating around in the back of my mind. We've had a series of raggedy excuses for target stands that work kinda. As long as the wind is at zero and no one makes any sudden moves. Sarge suggested we make some out of PVC. A great idea, and one I had been cataloging in my mind. What was I going  to need to make them and how best to put it together and repair it when it inevitably takes some hits. The other night I thought about an alternative. Rebar. It's simple steel, comes in a variety of sizes, can be readily welded, is actually fairly tough and should be pretty easy to repair. Lets find out.

Lu and I went to Big Box Home Remodel Store today and I bought three 8 foot sections of 3/8's inch rebar. I chose 3/8's because it's light, should (there's that word again) be strong enough and is cheap. Less than ten bucks for all three.

Here's the plan.
-The target stand will be 2 feet wide and 6 feet tall with a cross piece 3 feet from the top. It will have 2 feet, each 2 foot long with another 2 foot cross brace between them. Think an H shaped footing.
-Take two of the 8 footers and cut 2 feet off each. Then cut two more 2 foot sections out of the last 8 foot rebar. This will give us four 2 foot sections and two 6 foot sections. We'll also need 2 uprights that have an inside diameter approximately equal to the outside diameter of the rebar. We'll need a mounting system, something to cut metal and a welder.

Ok. Here's two of the 2 footers with the two 6 footers.

Here's the footing already cut and welded. I found 2 pieces of pipe just laying around to use as the uprights receptacles. These will hold the 6 foot sections when the stand is assembled. They were too large inside diameter but I'll address that later in the build. You can see the H shape I was talking about. 2 feet long by 2 feet wide.

A this point I needed to take some measurements. My target cardboards are 40 inches tall by 30 wide.

That gave me my final measurements for the target opening. I'll weld the 2 footers on the inside of the 6 foot uprights for a final width of right at 25 inches. I decided that 36 inches from the top was good for my cross brace.

First, square up the corners. Then weld a 2 foot section to one end of the 6 footers. This is the top of the stand.

25 inches wide.

I then marked a spot on each upright at 36 inches from the top and welded in the cross brace.

Remember I said the 2 pipes I welded into the footing to hold the uprights were too big? When I fitted the upper stand into the foot it wobbled badly. Now keep in mind I was working with whatever I had in the shop so please be kind. I had a piece of copper pipe with the correct inside diameter and 2 large square nuts that were the exact size I needed. I cut the copper so it would fit in the pipe flush and welded the nuts to the top. When I do another one I'll actually go out and buy some pipe that fits without going through gyrations to make it work. I swear. Probably. Maybe. (I won't).

The uprights now fit into the pipe perfectly. The stand is solid with no wobbling. You can see how the uprights fit into the footing.

Here's the stand complete but for the mounting system. It's 6 foot tall and 2 foot wide. It sits on a stand that's 2 foot by 2 foot. It may be too small but if so I can easily bend the feet or add length to them. Sarge and I talked about even adding claws to the feet or plates that we can stake to the ground.

On to the mounting system. Remember, I'm working with what I have. Anyone know what these are?

If you said "those wirish doodads one uses to mount things to peg board" you're obviously a Redneck. You would also be absolutely correct. I cut off the little single 'tail', leaving me with the other 2 for welding. Yes, that is a hand hacksaw. Please don't tell anyone. I don't want to lose my powertool cred.

Mounted and ready for welding. I sharpened the tips to make it easier to poke them through the cardboard. There are 2 at the top and 2 on the crossbrace.

Here's the final product with a cardboard attached. Angus insisted on modeling. Something about everything being better with a Lab. The mounting spikes are at the top and mid brace giving me 4 points of contact. If any one fails it'll still work. It'll even work if 2 fail, so long as one's at the top and the other at the bottom.

I know, the width of the stand is such that it it behind the edges of the cardboard. I built it this way for a couple of reasons.
Most of my targets, including the silhouettes, are 24 inches wide so good hits won't be an issue. The top and mid brace were always going to be behind the cardboard no matter what. I wanted a solid mount for the cardboard instead of relying on bunji's or similar. I like having something solid behind the target for it to push against. No blowing the target through this stand. Because I made it out of steel it'll be both tougher and easier to repair than PVC. It's round to full on hits will be rare and those that do hit shouldn't come back on the shooter (remember that shooting into steel is always dangerous. Wear your safety gear). I wanted it to be as small and light as I could manage while still being large enough for full sized targets.

The final weight of the entire stand was 10 pounds. As weighed on the calibrated, super accurate scales here at the Evil6 Incorporated R&D laboratories of course. Total outlay (minus the stuff I had 'just laying around') was 10 dollars and a couple of hours of work by Sarge and me. A lot of which was talking and lying about how well we shoot.

Will it work? Will it fall over in a mild breeze and completely mortify me? Will it break the first time Sarge or I hit it with anything larger than a BB gun and stubbornly refuse to be repaired? You'll just have to tune in later to find out. Sarge and I have a date at the Super Secret Evil6 Range Facility later this week. We'll put it through it's paces, including shooting it on purpose, and file a report. Backyard engineering. I dunno.

Success or abject failure. We shall see.

Six