Today was rough in plumbing day. This morning I cut out the sub floor to expose the main drain line and give myself space to get at everything. But.
Let me take a moment here to speak about DIY projects. There may very well come a time when you find yourself in over your head, especially in an older home. Try to keep your ego out of it. Know your limitations and never exceed them. There comes a time when calling in the experts is the smart choice. For me that day was today.
The plumbing on this house dates to 1950. That's 63 years. When I uncovered things this is what I found.
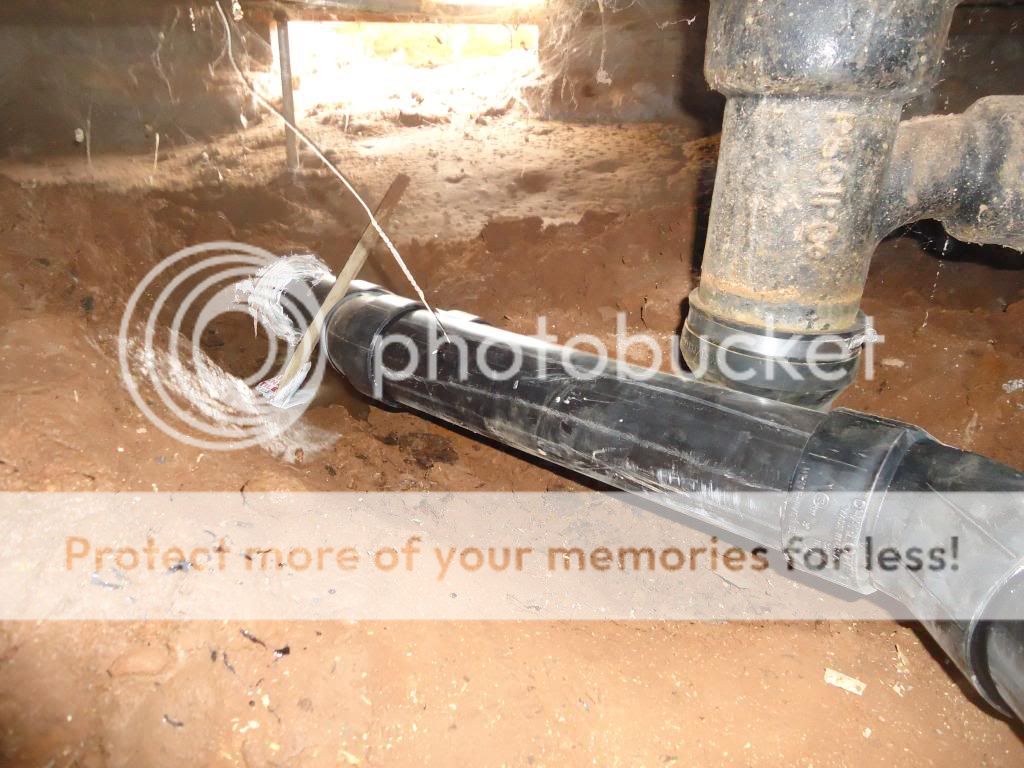
The down pipe is the drain from the bathroom toilet that runs into the main drain line to the street. The rest of the house ties in here as well. If you look closely you'll see two things that concerned me. The first is the Lead and Oakum joint. That is no bueno. Heck, I've never actually seen one before. Neither had Car Guy and he's seen everything. The second is the broken pipe. That is even no buenoer. To the left of the down pipe is a second 3 inch cast iron pipe. It runs from the down pipe toward the upper left in the picture. It's tough to see but if you look closely you can see that the top of the pipe has basically rotted completely away turning a pipe into a trench. Yep, we have a major problem here. It also explains the odor that bathroom has had since forever.
I can handle basic plumbing but this was way beyond my skills. I called a friend of a friend who is a licensed plumbing contractor and his number one guy for help. They managed to worm their way under the floor and remove the bad pipe and Oakum joint.
And installed a new joint and new ABS pipe. This is a Y pipe that services both the old bathroom and the new. I prefer ABS over PVC mostly because ABS has better impact and wear resistance than PVC.
Here's another look at that repaired joint and drain pipe. Those are the floor joists they somehow managed to worm through. Frankly I was prepared to rip up the bathroom floor for access. Thankfully I didn't have to.
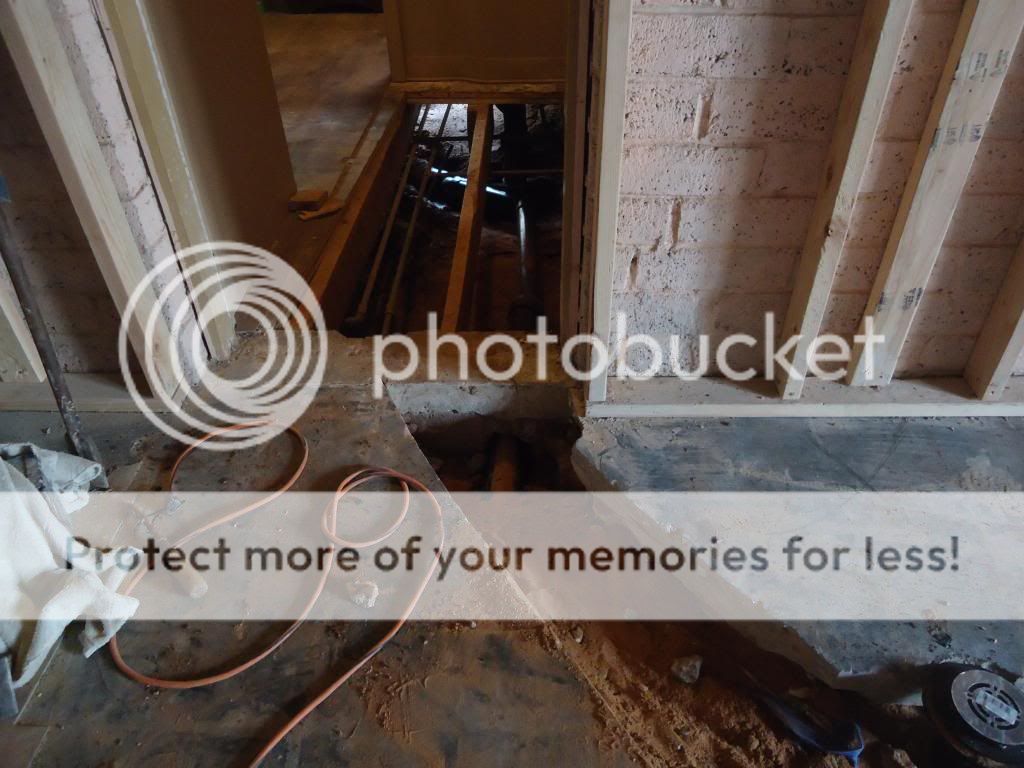
The rest of the rough in went without a hitch. here's the main feeder drain line running through the footer and under the threshold.
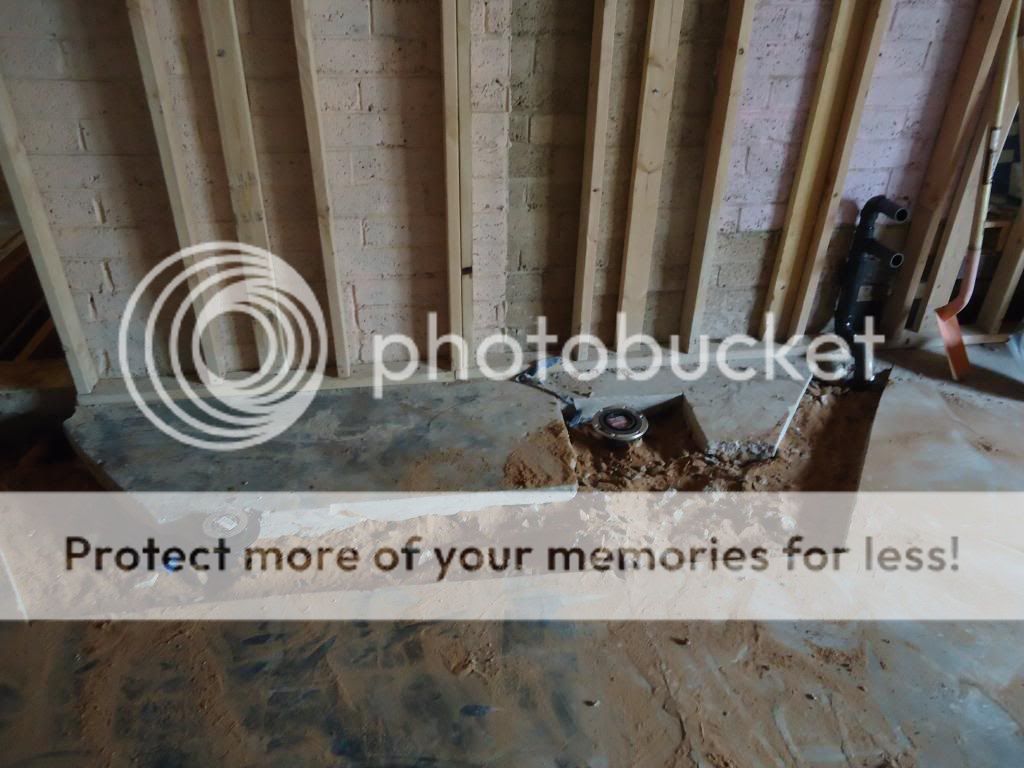
From there it runs to the new bathroom.
Shower on the left, toilet in the center and vanity sink on the right. I discussed it with my experts and we decided that an air admittance valve vent under the sink was adequate since the rest of the plumbing is well vented. That's the top pipe over on the right, just above the sink drain pipe. I'll run a 90 degree elbow in there for the vent when I install the sink. I forgot to take a picture before I back filled but all the pipe is ABS. And don't forget to leave room under the shower drain for a P Trap. Man, that second bathroom is finally looking like becoming a reality.
Once that was all done it was time to button things up. I prepped the floor by building a frame so I have nailers on all sides and in the middle. It's attached to the floor joists and braced left, center and right. I laid two layers of 3/4 inch plywood over the frame and screwed and glued it into place. I was still a bit too low so a layer of 7/16 OSB went over the plywood bringing me back to floor height.
I kept the old flooring so I could at least have a somewhat normal looking floor while we finish the build. When done this will all be tiled. Still, if you didn't know I cut out a 3x6 foot hole in that floor you'd never see it. It's even, solid and squeak free. Lu is a happy woman.
If you're contemplating putting in a new bathroom in an existing structure where one has never been before this is the kind of stuff you will have to deal with. It's a tough job but imminently doable. Just remember what I said about knowing your limitations and you'll be fine. If I can do it anyone can.
Tomorrow I'll mix and pour the concrete over the new plumbing. That will level the floor, provide the strength I need and get it all ready for framing. I should be able to start the framing by Saturday. Maybe even Friday evening. We're on a time table here and I can't afford to get behind. I have a few days to play with but something always goes wrong. Like today for example. Someday I am going to fix all the problems in this house.
Someday.
Six
'The true Soldier fights not because he hates what is in front of him, but because He loves what is behind him.' -G. K. Chesterton
Showing posts with label plumbing. Show all posts
07 November 2013
08 August 2012
Laundry Room Part 2 - Plumbing
Once all the electrical was in and done it was time to turn my efforts to plumbing. Of the two, electrical versus plumbing, I hate plumbing the most. It tends to be dirty, wet and sometimes nasty. Depending on whether trips under the house are indicated or not. In this case, thankfully, no subterranean work was necessary. In the future for certain but I'll take what I can get.
Let me do a little stage setting here. This is a picture of the plumbing juncture I had to work with. Click to enlarge if you're interested.
Here's the important stuff. In the center of the floor space you can see two 3/4 inch galvanized pipes, one of which has a copper pipe running off it to the right. That pipe is the main house supply line. The pipe just to it's right is the supply line from the street. There are three pipes against the wall, running left in the picture. The top one is a drain line from the water softener, the middle is the street supply that runs to the softener and the bottom is the house supply that comes from the softener. The softener, for some reason that I will probably never understand is located outside. In an area where, while not exactly arctic, does in fact get below freezing in the winter. Here's what it looks like.
It's placed in a large wooden box just outside the old Mud Room. The pipes run through the wall to the plumbing juncture.
The old water softener is...well, old. Really, really old.
All this needs to go and there was no way I was going to reinstall that old softener.
For anyone who regularly does plumbing Pex and Shark Bites (also called Gator Bites) are nothing new. For those who don't let me talk just a little about alternate means of plumbing. Pex is a little like a more durable and flexible version of PVC. It's really easy to work with and connects to other Pex, copper or PVC type materials with push in connectors called Shark Bites or Gator bites. Car Guy turned me on to the stuff and I love it. I will never sweat copper again. Here's a comparison.
On the left is copper and common screw in connectors (we'll leave sweating aside for the moment). On the right is a short length of white 1/2 inch Pex with some Shark Bites and a removal tool. That little orange crescent.
Here's a look inside a 3/4 inch Shark bite.
It's really simple to make a connection. When you've got the run all laid out and cut to length simply push one end of the Pex into the Shark Bite and you're connected. There are in line connectors, elbows and threaded fittings so you can screw the line into a device or attach something. Like Water Softeners and valves as we will see.
You can also remove the fittings easily with the removal tool. Just slide it on, compress the black gasket you can just see in this photo and pull on the pipe.
Et viola!
Shark Bites and Gator Bites. And yes, I paid for them all. No, I'm not getting anything in return from anybody to talk about them. Yes, I am easily and cheaply bribe-able for anyone with motivation and even shallow pockets. Take that FCC. When properly installed they're as permanent as sweated copper or screw in fittings and are code pretty much everywhere I know about and simplify plumbing projects by a factor of about a million. It's literally plug and play. Let's see how that transfers to an actual project shall we?
First step. Shut off the water at the meter. Important in that when you cut water pipes without that step things will get messy fast. Not that I'd know. I'm just guessing. Once done I cut all the pipes running to and from the old water softener. and then disconnected any excessive piping to the supply lines. I used Shark Bite connectors (threaded at one end to screw into the galvanized pipes) at the two 3/4 inch supply lines (from the street and to the house). Those pipes will go to the new water softener. I took the cold water washing machine supply from a T at the top of the softener output and found a very convenient hot water supply that ran to the kitchen sink. You can just see it over at the top right of the picture. We are cooking with gas now baby.
Here's a closer shot. Top pipe is the street supply. The bottom is from the softener to the house with a separate line to the washer. A nice, clean installation if I do say so myself and massively easy to do with a little planning and the right materials.
Ok. The water supply goes like this. A 3/4 inch pipe supplies the house from the street. It runs into the water softener and from there, via another 3/4 inch pipe, to the rest of the house. Here's the connections on the back of the water softener. On the left is the street supply to the softener and on the right is the output to the house.
A closer view. At the top is the plastic screw in connector on the softener attached to a copper adapter that necks from 1 inch (softener) to 3/4 inch for the supply pipes. Attached to them is another Shark Bite with a screw in on one end and a push in connector on the other. A short length of Pex to an elbow that connects to the Pex that runs to those supply connectors I showed above.
Here's a side view. Simple no?
You can see the water softener attached to the house supply lines with the washing machine supply lines running along the wall. A simple connection and one I will have immediate access to in case of emergencies. Knock wood. The softener is a GE ( I know but I was stuck) that flows 9.5 gallons per minute and has a hard water bypass during regeneration which means I have water while it cleans the resin beads. It only recharges on demand, not on a set schedule but always starts at 0200 unless I manually over ride it. It's a modern device that will last us for a very long time. YMMV but this is what we needed and it should supply all our conceivable needs. Hi Angus!
And we're almost done. All that's left is hose connections for the washer and then moving it into the laundry room for hook up and testing. Oh, and maybe some drains. Here's the hose hook ups. Horribly simple. Shark Bites again with a threaded end, attached to a quarter turn valve and hose hook up. One for cold and one for hot. When I finally get around to dry wall I'll mount these a little better but for now all I care about is that they work and don't leak.
And just like that it's done. I tied the drain for both the washer and softener into the drain line that the old softener used (with a little fudging, trial and error and cursing). I managed to wrestle the washer into the room, hooked it up and admired my handiwork while I waited for Lu to come home and try it out. Yep, that's her machine and I am not allowed to touch it except for moving it as necessary. Everything turns on, fills, drains, exhausts and generally works like it's supposed to. I am so happy!
I even put in a little temporary shelf so she had some place to put laundry stuff. Does it look like a laundry room now? I still have a lot of work to do in here but for now it's as done as we need it.
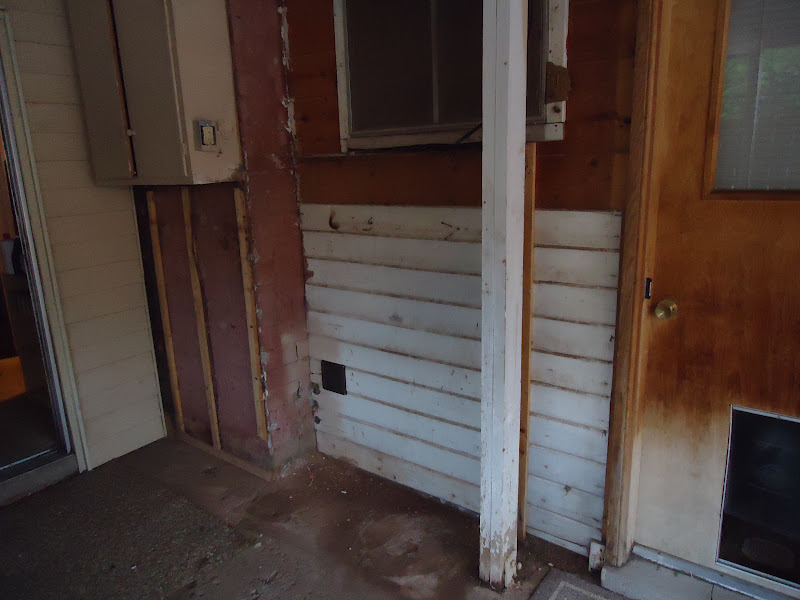
Remember that mess on the porch where the old softener was? Yep, all gone now. We removed an eyesore, opened up the porch and ensured that our water supply will not freeze up and maybe burst the pipes some day. That small dark square on the wall is the dryer vent.
Lu loves the new laundry room. It's just a few steps from the master bedroom. No more walks through the rain and sun and general nasty weather. Really, I'm embarrassed it took me this long. Sorry sweetheart. You've been doing my laundry for more than 30 years so shame on me for taking so long to do this.
What's next for this area? I'm glad you asked. This photo is dark but it should do. It's taken from the doorway in approximately the center of the house. It looks out to the porch. To the left is the master bedroom and to the right is the pantry. The center door leads to the new laundry room. I'm going to take that doorway and the wall on the left out and stubbing in a wall that will create a new hallway all the way from this doorway to the porch door, along the line shown. That will open up and enlarge the master bedroom and allow me to put in a new master bathroom. Oh yeah, I'll be doing more plumbing. A lot more. But I don't anticipate that until next summer. I still have a new roof on both the main house and the storage building to do before the weather turns.
All in all I am not unhappy with my work (and more importantly Lu is not unhappy with my work!). I managed to take what was an essentially unused room and turn it into a functional and useful part of the house with reasonable cost and reasonable effort. Total outlay, including all materials and the softener is well under a grand and the softener was 600 bucks. Don't let this kind of stuff put you off. Car Guy taught me a lot but the rest I got through makee learnee. The hardware guy and I are on a first name basis. Just plan as well as you can, don't be afraid to ask questions and understand that you'll be back and forth to the hardware store buying and returning stuff you got wrong the first time. It is not rocket science and it can be learned and mastered by us do it yourselfers. Hey, if I can do it anyone can do it!
Six
Let me do a little stage setting here. This is a picture of the plumbing juncture I had to work with. Click to enlarge if you're interested.
Here's the important stuff. In the center of the floor space you can see two 3/4 inch galvanized pipes, one of which has a copper pipe running off it to the right. That pipe is the main house supply line. The pipe just to it's right is the supply line from the street. There are three pipes against the wall, running left in the picture. The top one is a drain line from the water softener, the middle is the street supply that runs to the softener and the bottom is the house supply that comes from the softener. The softener, for some reason that I will probably never understand is located outside. In an area where, while not exactly arctic, does in fact get below freezing in the winter. Here's what it looks like.
It's placed in a large wooden box just outside the old Mud Room. The pipes run through the wall to the plumbing juncture.
The old water softener is...well, old. Really, really old.
All this needs to go and there was no way I was going to reinstall that old softener.
For anyone who regularly does plumbing Pex and Shark Bites (also called Gator Bites) are nothing new. For those who don't let me talk just a little about alternate means of plumbing. Pex is a little like a more durable and flexible version of PVC. It's really easy to work with and connects to other Pex, copper or PVC type materials with push in connectors called Shark Bites or Gator bites. Car Guy turned me on to the stuff and I love it. I will never sweat copper again. Here's a comparison.
On the left is copper and common screw in connectors (we'll leave sweating aside for the moment). On the right is a short length of white 1/2 inch Pex with some Shark Bites and a removal tool. That little orange crescent.
Here's a look inside a 3/4 inch Shark bite.
It's really simple to make a connection. When you've got the run all laid out and cut to length simply push one end of the Pex into the Shark Bite and you're connected. There are in line connectors, elbows and threaded fittings so you can screw the line into a device or attach something. Like Water Softeners and valves as we will see.
You can also remove the fittings easily with the removal tool. Just slide it on, compress the black gasket you can just see in this photo and pull on the pipe.
Et viola!
Shark Bites and Gator Bites. And yes, I paid for them all. No, I'm not getting anything in return from anybody to talk about them. Yes, I am easily and cheaply bribe-able for anyone with motivation and even shallow pockets. Take that FCC. When properly installed they're as permanent as sweated copper or screw in fittings and are code pretty much everywhere I know about and simplify plumbing projects by a factor of about a million. It's literally plug and play. Let's see how that transfers to an actual project shall we?
First step. Shut off the water at the meter. Important in that when you cut water pipes without that step things will get messy fast. Not that I'd know. I'm just guessing. Once done I cut all the pipes running to and from the old water softener. and then disconnected any excessive piping to the supply lines. I used Shark Bite connectors (threaded at one end to screw into the galvanized pipes) at the two 3/4 inch supply lines (from the street and to the house). Those pipes will go to the new water softener. I took the cold water washing machine supply from a T at the top of the softener output and found a very convenient hot water supply that ran to the kitchen sink. You can just see it over at the top right of the picture. We are cooking with gas now baby.
Here's a closer shot. Top pipe is the street supply. The bottom is from the softener to the house with a separate line to the washer. A nice, clean installation if I do say so myself and massively easy to do with a little planning and the right materials.
Ok. The water supply goes like this. A 3/4 inch pipe supplies the house from the street. It runs into the water softener and from there, via another 3/4 inch pipe, to the rest of the house. Here's the connections on the back of the water softener. On the left is the street supply to the softener and on the right is the output to the house.
A closer view. At the top is the plastic screw in connector on the softener attached to a copper adapter that necks from 1 inch (softener) to 3/4 inch for the supply pipes. Attached to them is another Shark Bite with a screw in on one end and a push in connector on the other. A short length of Pex to an elbow that connects to the Pex that runs to those supply connectors I showed above.
Here's a side view. Simple no?
You can see the water softener attached to the house supply lines with the washing machine supply lines running along the wall. A simple connection and one I will have immediate access to in case of emergencies. Knock wood. The softener is a GE ( I know but I was stuck) that flows 9.5 gallons per minute and has a hard water bypass during regeneration which means I have water while it cleans the resin beads. It only recharges on demand, not on a set schedule but always starts at 0200 unless I manually over ride it. It's a modern device that will last us for a very long time. YMMV but this is what we needed and it should supply all our conceivable needs. Hi Angus!
And we're almost done. All that's left is hose connections for the washer and then moving it into the laundry room for hook up and testing. Oh, and maybe some drains. Here's the hose hook ups. Horribly simple. Shark Bites again with a threaded end, attached to a quarter turn valve and hose hook up. One for cold and one for hot. When I finally get around to dry wall I'll mount these a little better but for now all I care about is that they work and don't leak.
And just like that it's done. I tied the drain for both the washer and softener into the drain line that the old softener used (with a little fudging, trial and error and cursing). I managed to wrestle the washer into the room, hooked it up and admired my handiwork while I waited for Lu to come home and try it out. Yep, that's her machine and I am not allowed to touch it except for moving it as necessary. Everything turns on, fills, drains, exhausts and generally works like it's supposed to. I am so happy!
I even put in a little temporary shelf so she had some place to put laundry stuff. Does it look like a laundry room now? I still have a lot of work to do in here but for now it's as done as we need it.
Remember that mess on the porch where the old softener was? Yep, all gone now. We removed an eyesore, opened up the porch and ensured that our water supply will not freeze up and maybe burst the pipes some day. That small dark square on the wall is the dryer vent.
Lu loves the new laundry room. It's just a few steps from the master bedroom. No more walks through the rain and sun and general nasty weather. Really, I'm embarrassed it took me this long. Sorry sweetheart. You've been doing my laundry for more than 30 years so shame on me for taking so long to do this.
What's next for this area? I'm glad you asked. This photo is dark but it should do. It's taken from the doorway in approximately the center of the house. It looks out to the porch. To the left is the master bedroom and to the right is the pantry. The center door leads to the new laundry room. I'm going to take that doorway and the wall on the left out and stubbing in a wall that will create a new hallway all the way from this doorway to the porch door, along the line shown. That will open up and enlarge the master bedroom and allow me to put in a new master bathroom. Oh yeah, I'll be doing more plumbing. A lot more. But I don't anticipate that until next summer. I still have a new roof on both the main house and the storage building to do before the weather turns.
All in all I am not unhappy with my work (and more importantly Lu is not unhappy with my work!). I managed to take what was an essentially unused room and turn it into a functional and useful part of the house with reasonable cost and reasonable effort. Total outlay, including all materials and the softener is well under a grand and the softener was 600 bucks. Don't let this kind of stuff put you off. Car Guy taught me a lot but the rest I got through makee learnee. The hardware guy and I are on a first name basis. Just plan as well as you can, don't be afraid to ask questions and understand that you'll be back and forth to the hardware store buying and returning stuff you got wrong the first time. It is not rocket science and it can be learned and mastered by us do it yourselfers. Hey, if I can do it anyone can do it!
Six
Subscribe to:
Posts (Atom)